QuickFuzz
Fuzz入门,学习参考:Baby Fuzz · Home,BV1ZM4m1R7gZ
模糊测试理论与工具实践
总览
模糊测试又称为fuzzing,是一种软件测试技术。其核心概念为自动产生随机输入到一个程序中,并监视程序异常,如崩溃、断言失败,以发现可能的程序错误。
举例
测试.c:
 1
 2
 3
 4
 5
 6
 7
 8
 9
10
11
12
|
// gcc -o test test.c
#include <unistd.h>

int main()
{
    char input[8] = {0};
    read(STDIN_FILENO, input, 8);
    if (input[0] == 'A' && input[1] == 'B') // (1)
        *((unsigned int *)0) = 0xdeadbeef; // (2),将空指针赋值为0xdeadbeef,引发程序崩溃
    write(STDOUT_FILENO, input, 8);
    return 0;
}
|
模糊器.py:
 1
 2
 3
 4
 5
 6
 7
 8
 9
10
11
12
13
14
|
import subprocess

target = './test'
inps = ['AA', 'BB', 'BA', 'AB']

for inp in inps:
    // 不断测试哪些输入会引发程序崩溃
    try:
        subprocess.run([target], input=inp.encode(), capture_output=True, check=True)
    except subprocess.CalledProcessError: # (1)
        print(f"bug found with input: '{inp}'")

# (output)
# bug found with input: 'AB'
|
内部架构
在执行时会因为不同的条件执行不同的程序码,而不同的条件主要if就是定义
1
2
3
4
|
if (a == 1 && b == 2)
    puts("condition 1");
else
    puts("condition 2");
|

IDA pro生产出来的指令级别的控制流图(CFG)

fuzzing流程大致可以拆成三个组件分别为:
1.种子选择、2.突变、3.覆盖范围。

举例:
测试.c
 1
 2
 3
 4
 5
 6
 7
 8
 9
10
11
12
13
14
15
16
17
18
19
20
|
// gcc -o test test.c
#include <unistd.h>
#include <stdio.h>

int main()
{
    char input[8] = {0};
    read(STDIN_FILENO, input, 8);

    if (input[0] == 'A') {
        puts("AAA");
        if (input[1] == 'B') {
           puts("BBB");
           if (input[2] == 'C') {
            *((unsigned int *)0) = 0xdeadbeef; // bug
           }
        }
    }
    return 0;
}
|
测试器.py
 1
 2
 3
 4
 5
 6
 7
 8
 9
10
11
12
13
14
15
16
17
18
19
20
21
22
23
|
import subprocess
import random

target = './test'
inps = ['A', 'B'] # 语料库
count = 1

while True:
    inp = inps[0] # 种子选择演算法比较简单,使用最新的的种子作为下一个输入
    inp += random.choice(['A', 'B', 'C']) # 变异演算会挑选出来的种子加上一个随机字元作为最终的输入。
    del inps[0] #加一个删一个,保证下次取的是下一个
    count += 1 #记录处理了多少个输入

    try:
        comp = subprocess.run([target], input=inp.encode(), capture_output=True, check=True)
        if comp.stdout != b'':
            inps.append(inp) # 如果有输出的话则代表此输入为有趣
    except subprocess.CalledProcessError:
        print(f"bug found with input: '{inp}'")
        break

    if count % 100 == 0 or len(inps) == 0: # 定期打乱语料库,避免变异效果不好导致输入无法取得新的覆盖范围
        inps = ['A', 'B']
|
模糊器的好坏,通常是:
- 种子选择是否能挑出真正有意义的种子
- 变异的随机是否有效率
- 覆盖实现的方式是否会造成大量的开销。
AFL(American Fuzz Loop)
– 简介 & 安装
以下是一些比较有名的开源模糊测试工具:
- American Fuzzy Lop (AFL): AFL 是一个高效的模糊测试工具
- libFuzzer: libFuzzer 是 LLVM/Clang 提供的一个模糊测试引擎,它可以轻松地集成到现有的代码中
- Syzkaller: Syzkaller 是一个专注于系统调用接口的模糊测试工具,它可以自动生成各种系统调用序列,并对内核进行测试以发现漏洞和错误。
- OSS-Fuzz: OSS-Fuzz旨在通过自动化模糊测试发现开源软件中的安全漏洞和错误。
Fuzz方式
AFL有两种fuzz途径:
- 开源软件:AFL软件进行编译的同时进行插桩,以方便fuzz
- 闭源软件:配合QEMU直接对闭源的二进制代码进行fuzz
环境搭建
安装
Linux包管理(deb):
1
|
$ sudo apt install afl++
|
源码编译安装 :
下载源码自行编译:(推荐安装AFL++,AFl的话如果开ASAN可能有问题)
1
2
3
4
|
$ git clone https://github.com/AFLplusplus/AFLplusplus.git
$ cd AFLplusplus
$ make
$ sudo make install
|
AFL(American Fuzz Loop)
插桩(instrumentation)
在保证原程序逻辑的完整性下,在程序中插入一些程序码来采集运行期间的执行状态。
1
2
3
4
5
6
7
8
9
|
int test_var = 0;

// original (1)
void b() { ...; }
void a() { ...; }

// instrumented (2)
void b() { printf("test_var: %d\n", test_var); ...; }
void a() { printf("test_var: %d\n", test_var); ...; }
|
特点:
- 插桩的对象通常都具有相同的属性或类别涉及所有的功能、所有的基本块,比较少针对单一目标。
- 插桩的程序代码通常只有几行汇编代码,并且不会做太复杂的操作
- 在模糊器中,插桩被用来进行覆盖,那么记录多少程序码被执行到。
举例:
 1
 2
 3
 4
 5
 6
 7
 8
 9
10
11
12
13
14
15
16
|
int had_exec[100] = {0};

void a()
{
    had_exec[0] = 1; // (1)
    // ...
}
void b() { had_exec[1] = 1; ...; }
void c() { had_exec[2] = 1; ...; }

int main()
{
    // ...
    if (had_exec[0]) // (2)
        puts("function a had been called");
}
|
Demo
演示
测试程序test.c
 1
 2
 3
 4
 5
 6
 7
 8
 9
10
11
12
13
14
15
16
|
#include <stdio.h>
#include <unistd.h>

int main()
{
    int a, idx;
    char buf[100];

    scanf("%d", &idx);
    buf[idx] = '\0';

    read(0, &a, 0x2);
    if (a == 0xdead)
        *(int *)0 = 0xdeadbeef;
    return 0;
}
|
afl-gcc
1
2
|
$ export AFL_USE_ASAN=1
$ afl-gcc -fsanitize=address -o test test.c
|
gcc选用afl的汇编器来编译
1
|
$ gcc -fsanitize=address -o test test.c -B ~/fuzz/AFLplusplus -g -O3 -funroll-loops -D__AFL_COMPILER=1 -DFUZZING_BUILD_MODE_UNSAFE_FOR_PRODUCTION=1
|
- 有趣的是
-B ~/fuzz/AFL,gcc 会尝试在这里寻找路径工具链中的汇编器来执行
1
2
|
$ ls -al ~/fuzz/AFLplusplus/as
$ lrwxrwxrwx 1 lidaxian lidaxian 6 Mar 29 14:53 as -> afl-as
|
afl-as
- afl-as首先会执行函数
add_instrumentation()做插桩(对汇编代码),最后执行as做汇编(编译成机械代码)。所以插桩是在编译之后汇编之前。
- 做完插桩后会执行调整后的参数来汇编新的asm文件,最后产生的执行文件test即是有插桩的版本,简单用objdump就可以看到许多以__afl为前缀的函数(说明已完成插桩):
1
2
3
4
5
|
$ objdump -M intel -d test | grep afl
    119d:       e8 1e 02 00 00          call   13c0 <__afl_maybe_log>
    120d:       e8 ae 01 00 00          call   13c0 <__afl_maybe_log>
    1255:       e8 66 01 00 00          call   13c0 <__afl_maybe_log>
    12a1:       e8 1a 01 00 00          call   13c0 <__afl_maybe_log>
|
afl-fuzz
1
|
afl-fuzz -i seed-dir -o out-dir -m none ./test
|
- -i - 存放测试用例的资料夹
- -o - 搁置执行结果资料夹
- -f - 从指定文件读取输入
- -t - timeout,执行时间超过的话就会被kill掉
- -m - 内存限制,执行时所能使用的内存体上限
- -d - 跳过确定性,突变阶段跳过最初的处理
- -n - 对没有插桩的目标进行模糊测试
tips:
运行后遇到一些问题:
 1
 2
 3
 4
 5
 6
 7
 8
 9
10
11
12
13
14
15
16
17
18
19
20
21
22
23
24
25
|
demian@Friday:~/C_lab/fuzz$ afl-fuzz -i seed-dir -o out-dir -m none ./test~
afl-fuzz++4.09c based on afl by Michal Zalewski and a large online community
[+] AFL++ is maintained by Marc "van Hauser" Heuse, Dominik Maier, Andrea Fioraldi and Heiko "hexcoder" Eißfeldt
[+] AFL++ is open source, get it at https://github.com/AFLplusplus/AFLplusplus
[+] NOTE: AFL++ >= v3 has changed defaults and behaviours - see README.md
[+] No -M/-S set, autoconfiguring for "-S default"
[*] Getting to work...
[+] Using exponential power schedule (FAST)
[+] Enabled testcache with 50 MB
[+] Generating fuzz data with a length of min=1 max=1048576
[*] Checking core_pattern...

[-] Hmm, your system is configured to send core dump notifications to an
    external utility. This will cause issues: there will be an extended delay
    between stumbling upon a crash and having this information relayed to the
    fuzzer via the standard waitpid() API.
    If you're just testing, set 'AFL_I_DONT_CARE_ABOUT_MISSING_CRASHES=1'.

    To avoid having crashes misinterpreted as timeouts, please log in as root
    and temporarily modify /proc/sys/kernel/core_pattern, like so:

    echo core >/proc/sys/kernel/core_pattern

[-] PROGRAM ABORT : Pipe at the beginning of 'core_pattern'
         Location : check_crash_handling(), src/afl-fuzz-init.c:2361
|
从错误信息来看,系统配置了外部工具来处理核心转储(core dump),这会导致 AFL++ 无法正确处理崩溃信息。
所以我们要修改系统的 core_pattern 配置。
首先,运行以下命令查看当前的 core_pattern 配置:
1
|
cat /proc/sys/kernel/core_pattern
|
输出类似于 |/usr/lib/systemd/systemd-coredump %p %u %g %s %t %c %h,说明系统配置了外部工具来处理核心转储。
然后以 root 用户身份运行以下命令,将 core_pattern 修改为 core:
1
|
echo core | sudo tee /proc/sys/kernel/core_pattern
|
再次查看 core_pattern 配置,确认修改成功:
1
|
cat /proc/sys/kernel/core_pattern
|
如果输出为 core,说明修改成功。
接下来就可以重新运行 AFL-fuzz。
1
|
afl-fuzz -i seed-dir -o out-dir -m none ./test
|
在创建了相关目录和种子文件后,命令运行成功就能在终端看见如下结果了:
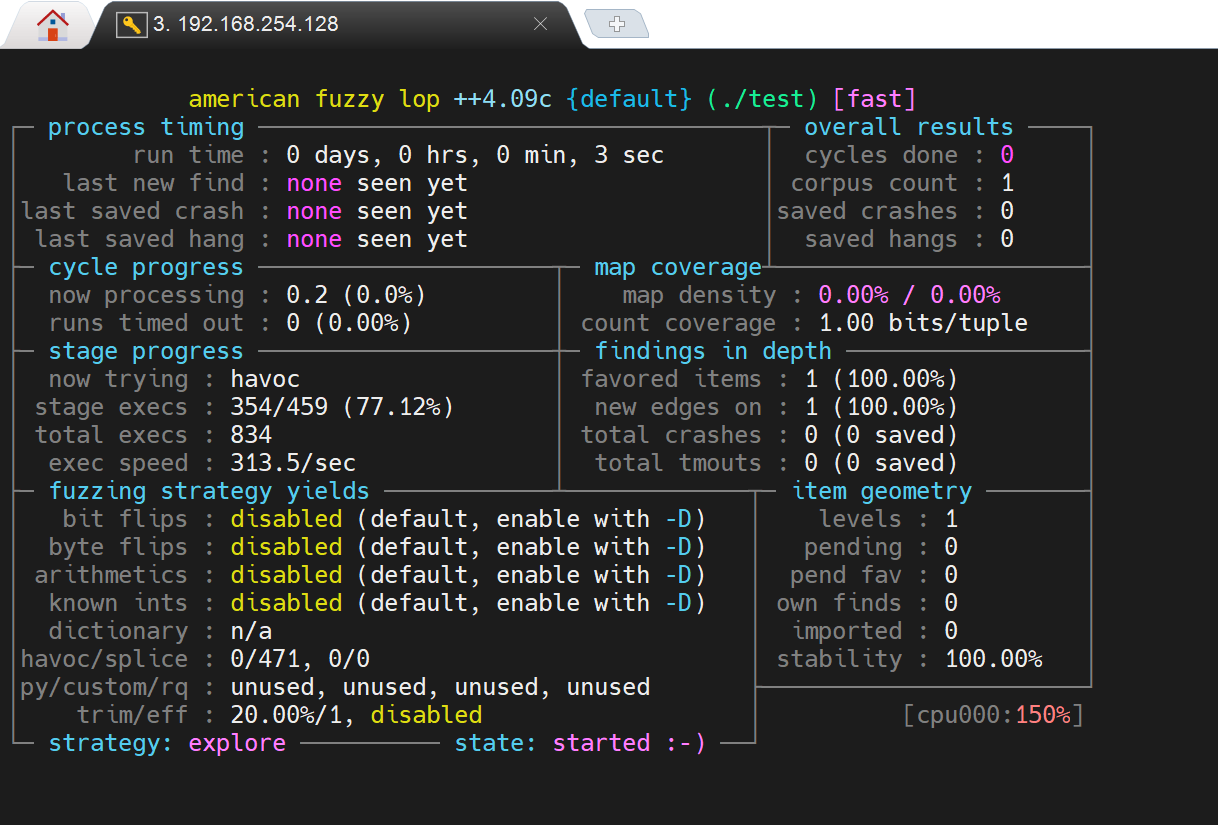
Crash分析
out-dir/crashes目录下的内容是引发崩溃的输入。
Sanitizer
即使程序存在漏洞,也不一定会在执行到有漏洞的程式码时触发异常
举例:
1
2
3
|
char buf[100];
scanf("%d", &idx);
buf[idx] = '\0'; // (1)
|
然而即便会有out-of-bound write 的漏洞发生,但如果buf[101]对应到的地址正好没被使用到,那么fuzzer也不会感兴趣。
所以我们需要“Sanitizer”来辅助检测程序问题,它是一种用于检测程序中各种错误(如内存错误、数据竞争等)的工具。它通常集成在编译器中,可以在程序运行时检测问题。
能辅助检测,但是有额外性能和时间需求。
常见的Sanitizer有:
- AddressSanitizer (+LeakSanitizer)
- ThreadSanitizer
- UndefinedBehaviorSanitizer
- MemorySanitizer
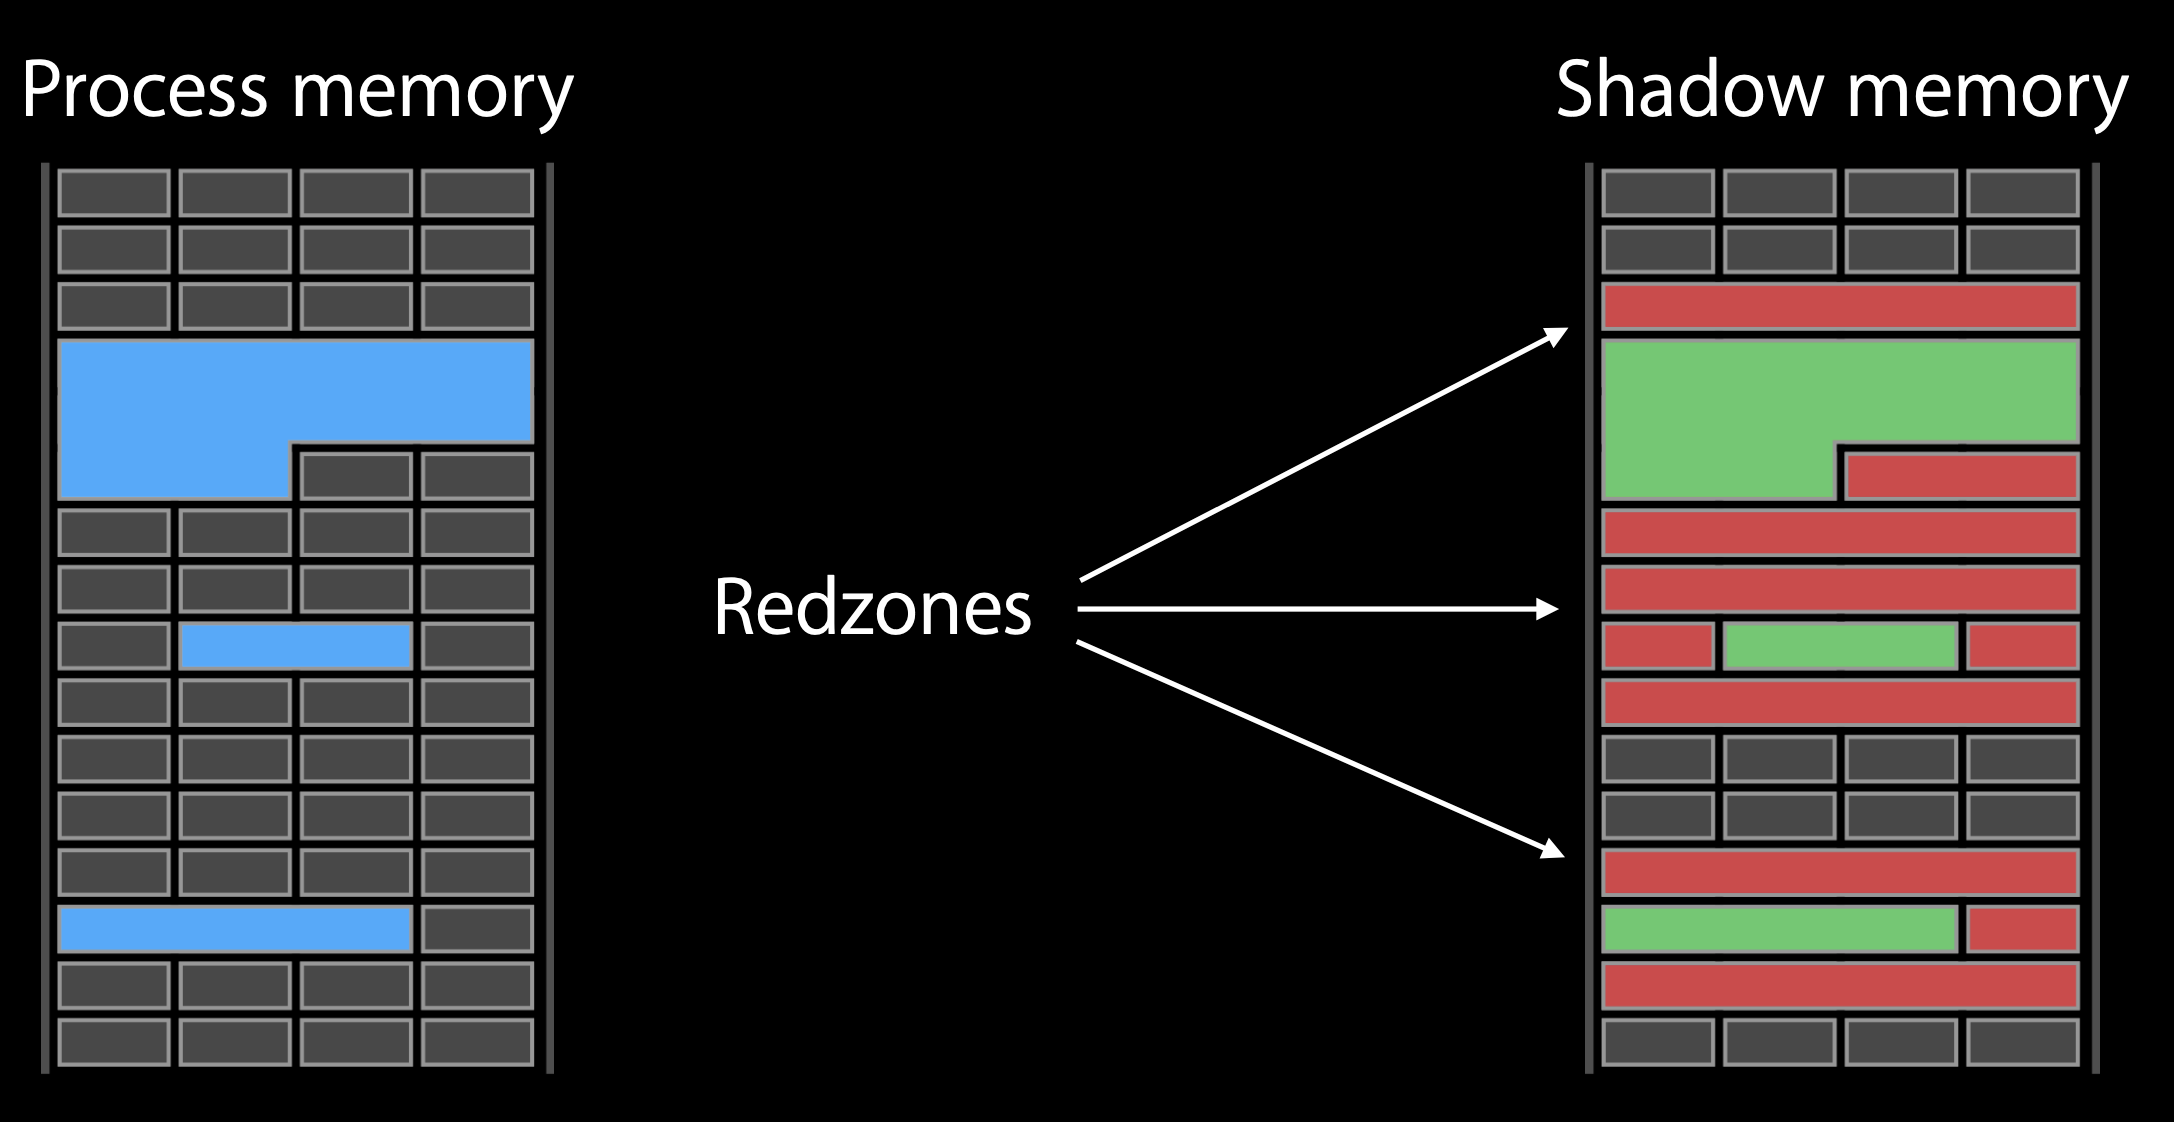
AddressSanitizer原理简介
这个内存检查是如何工作的?
左侧,蓝色区域是我们分配的内存在右侧
右侧,Redzones是中毒的内存,访问即报错。
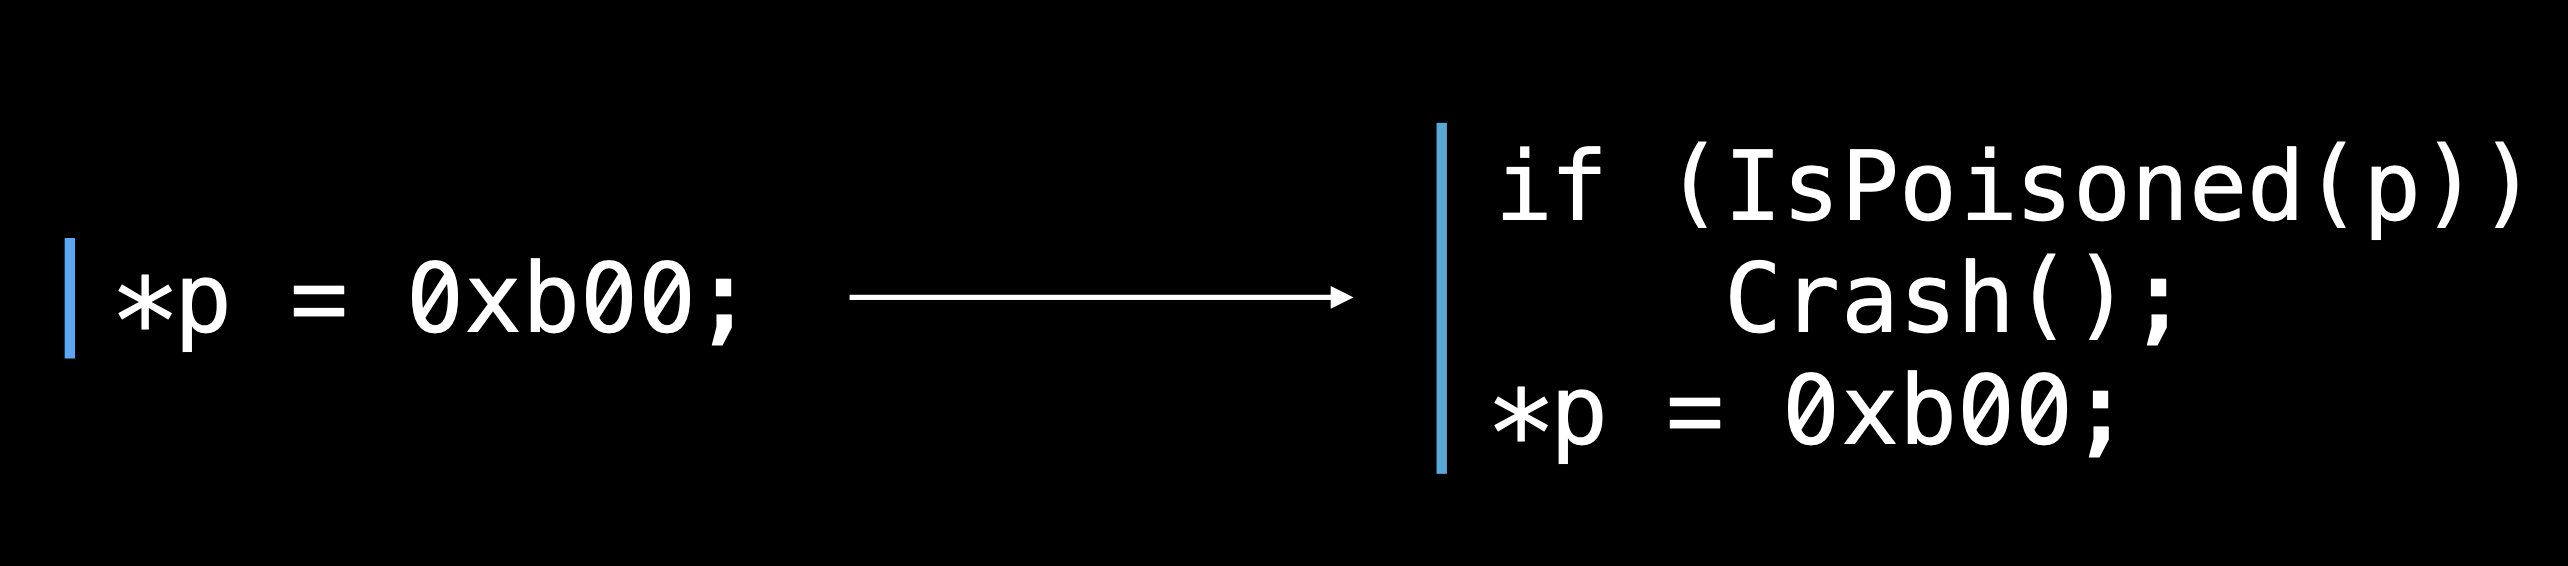
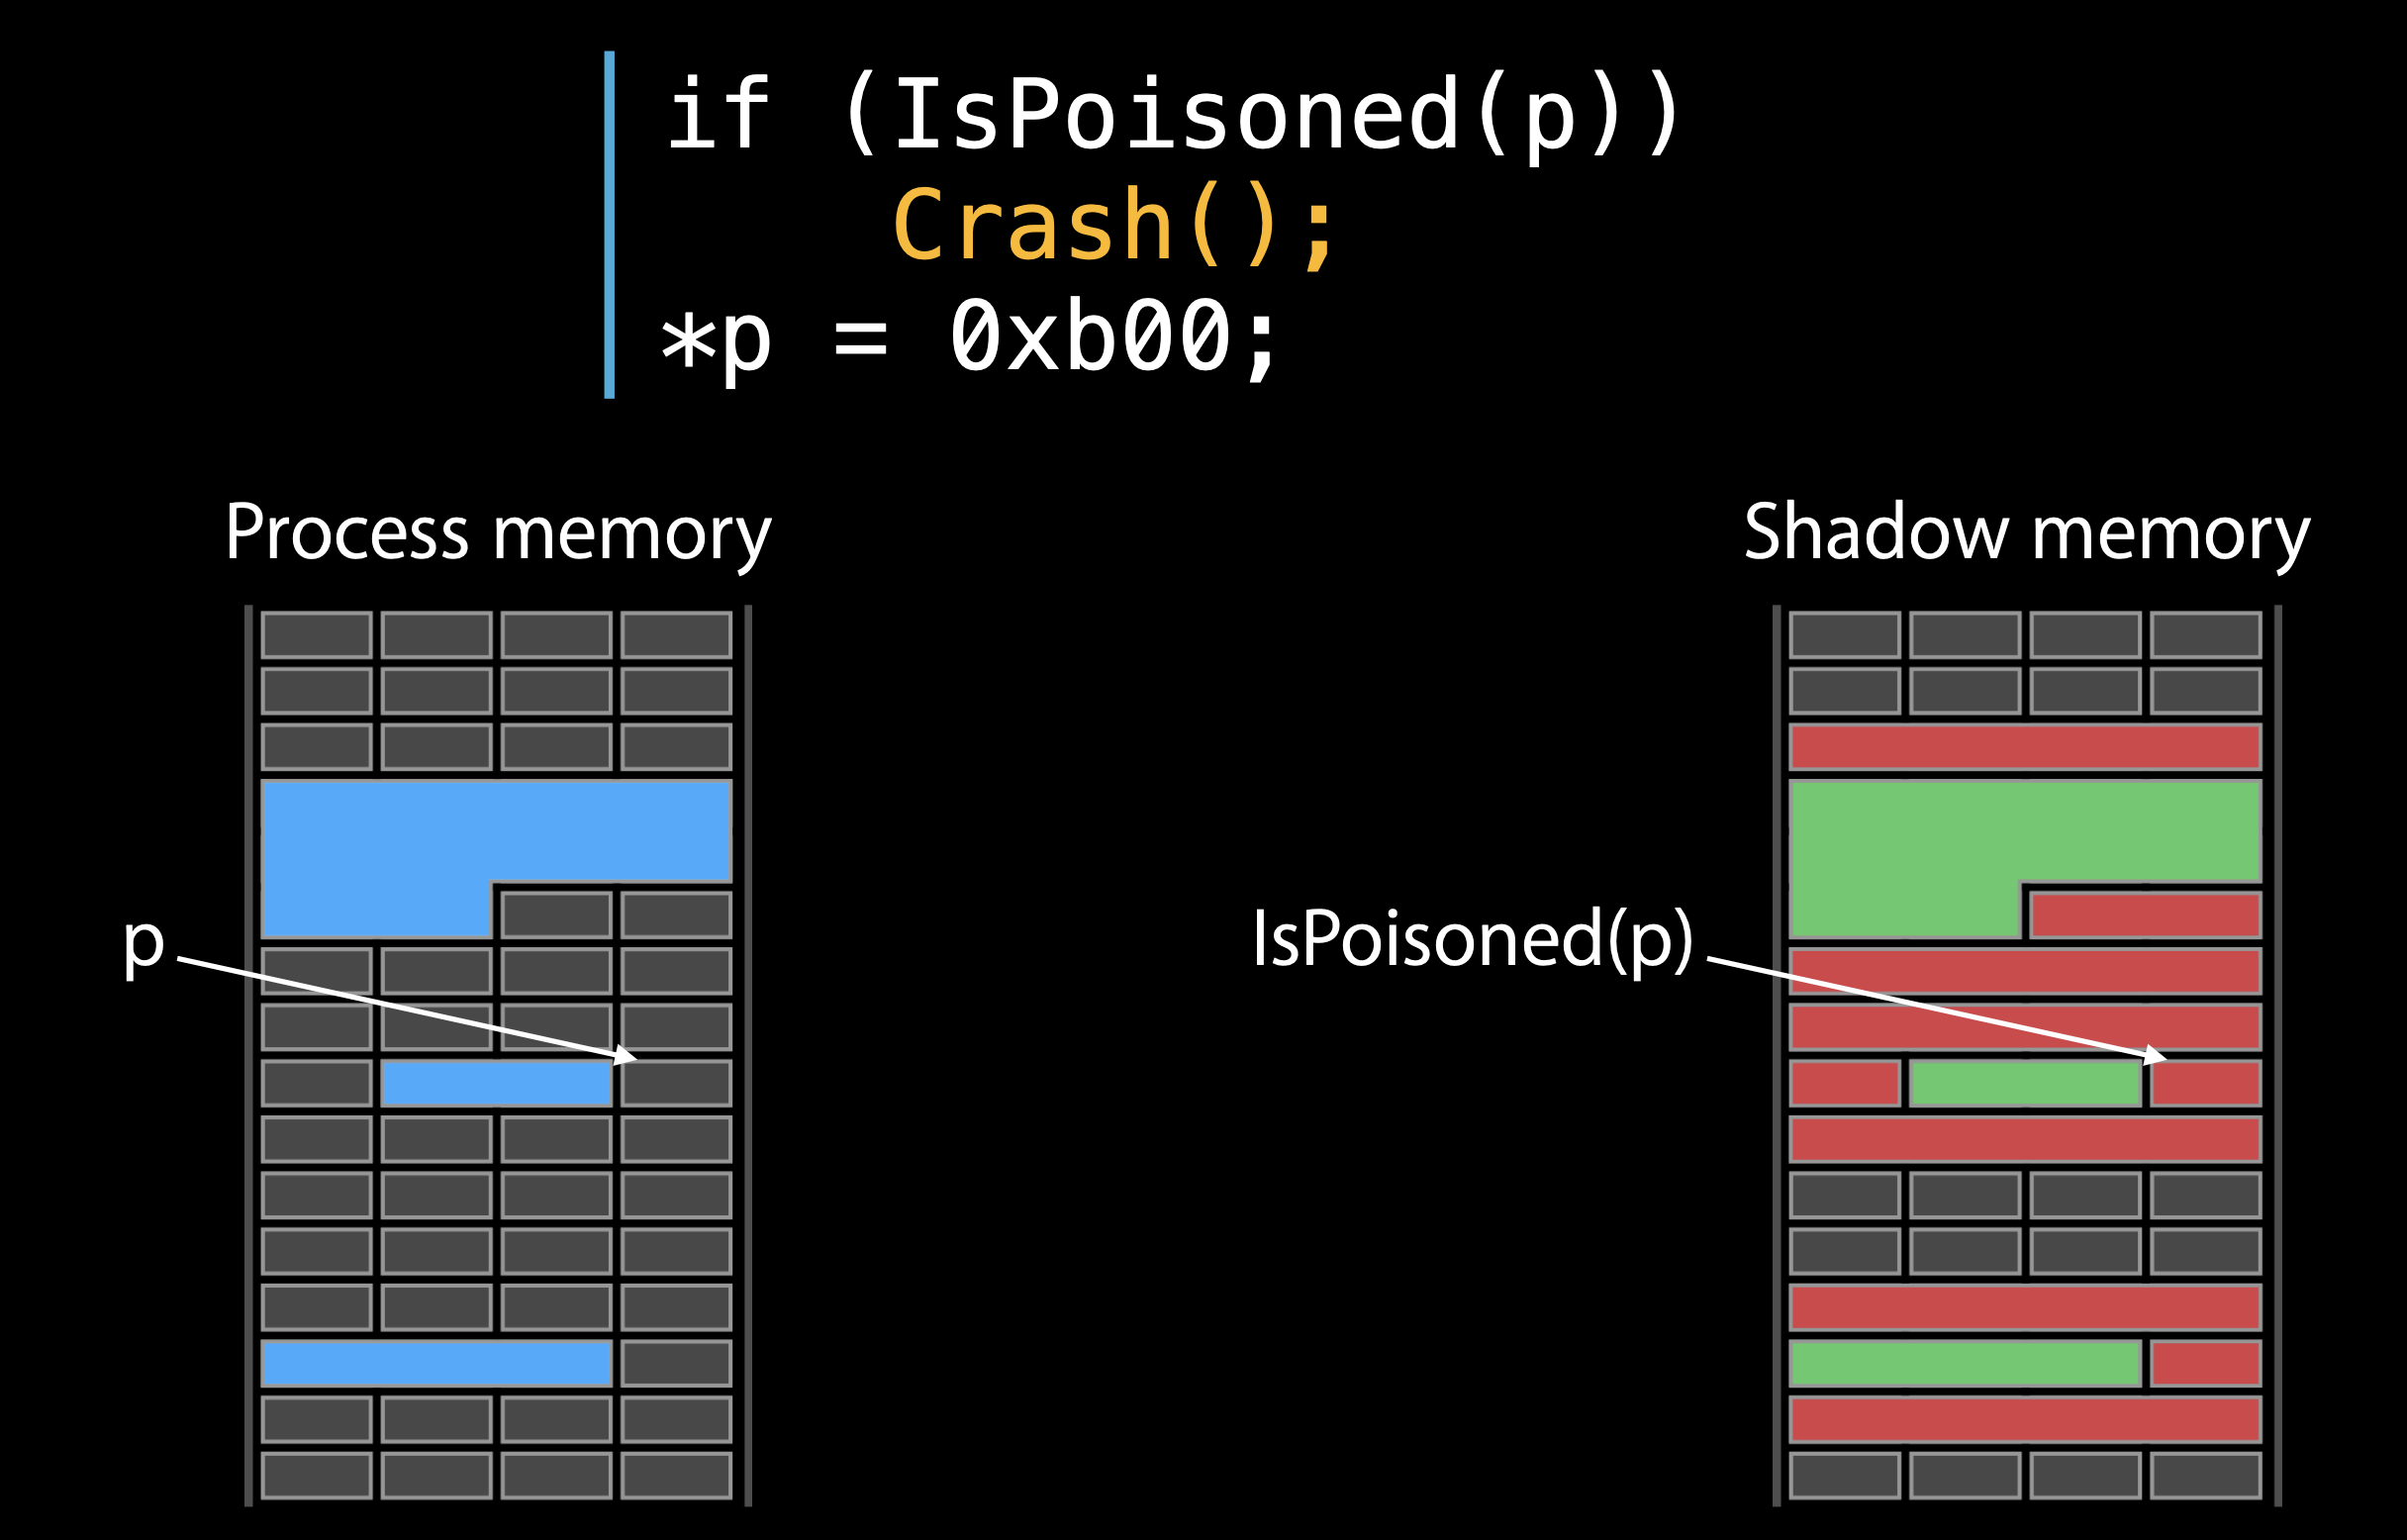
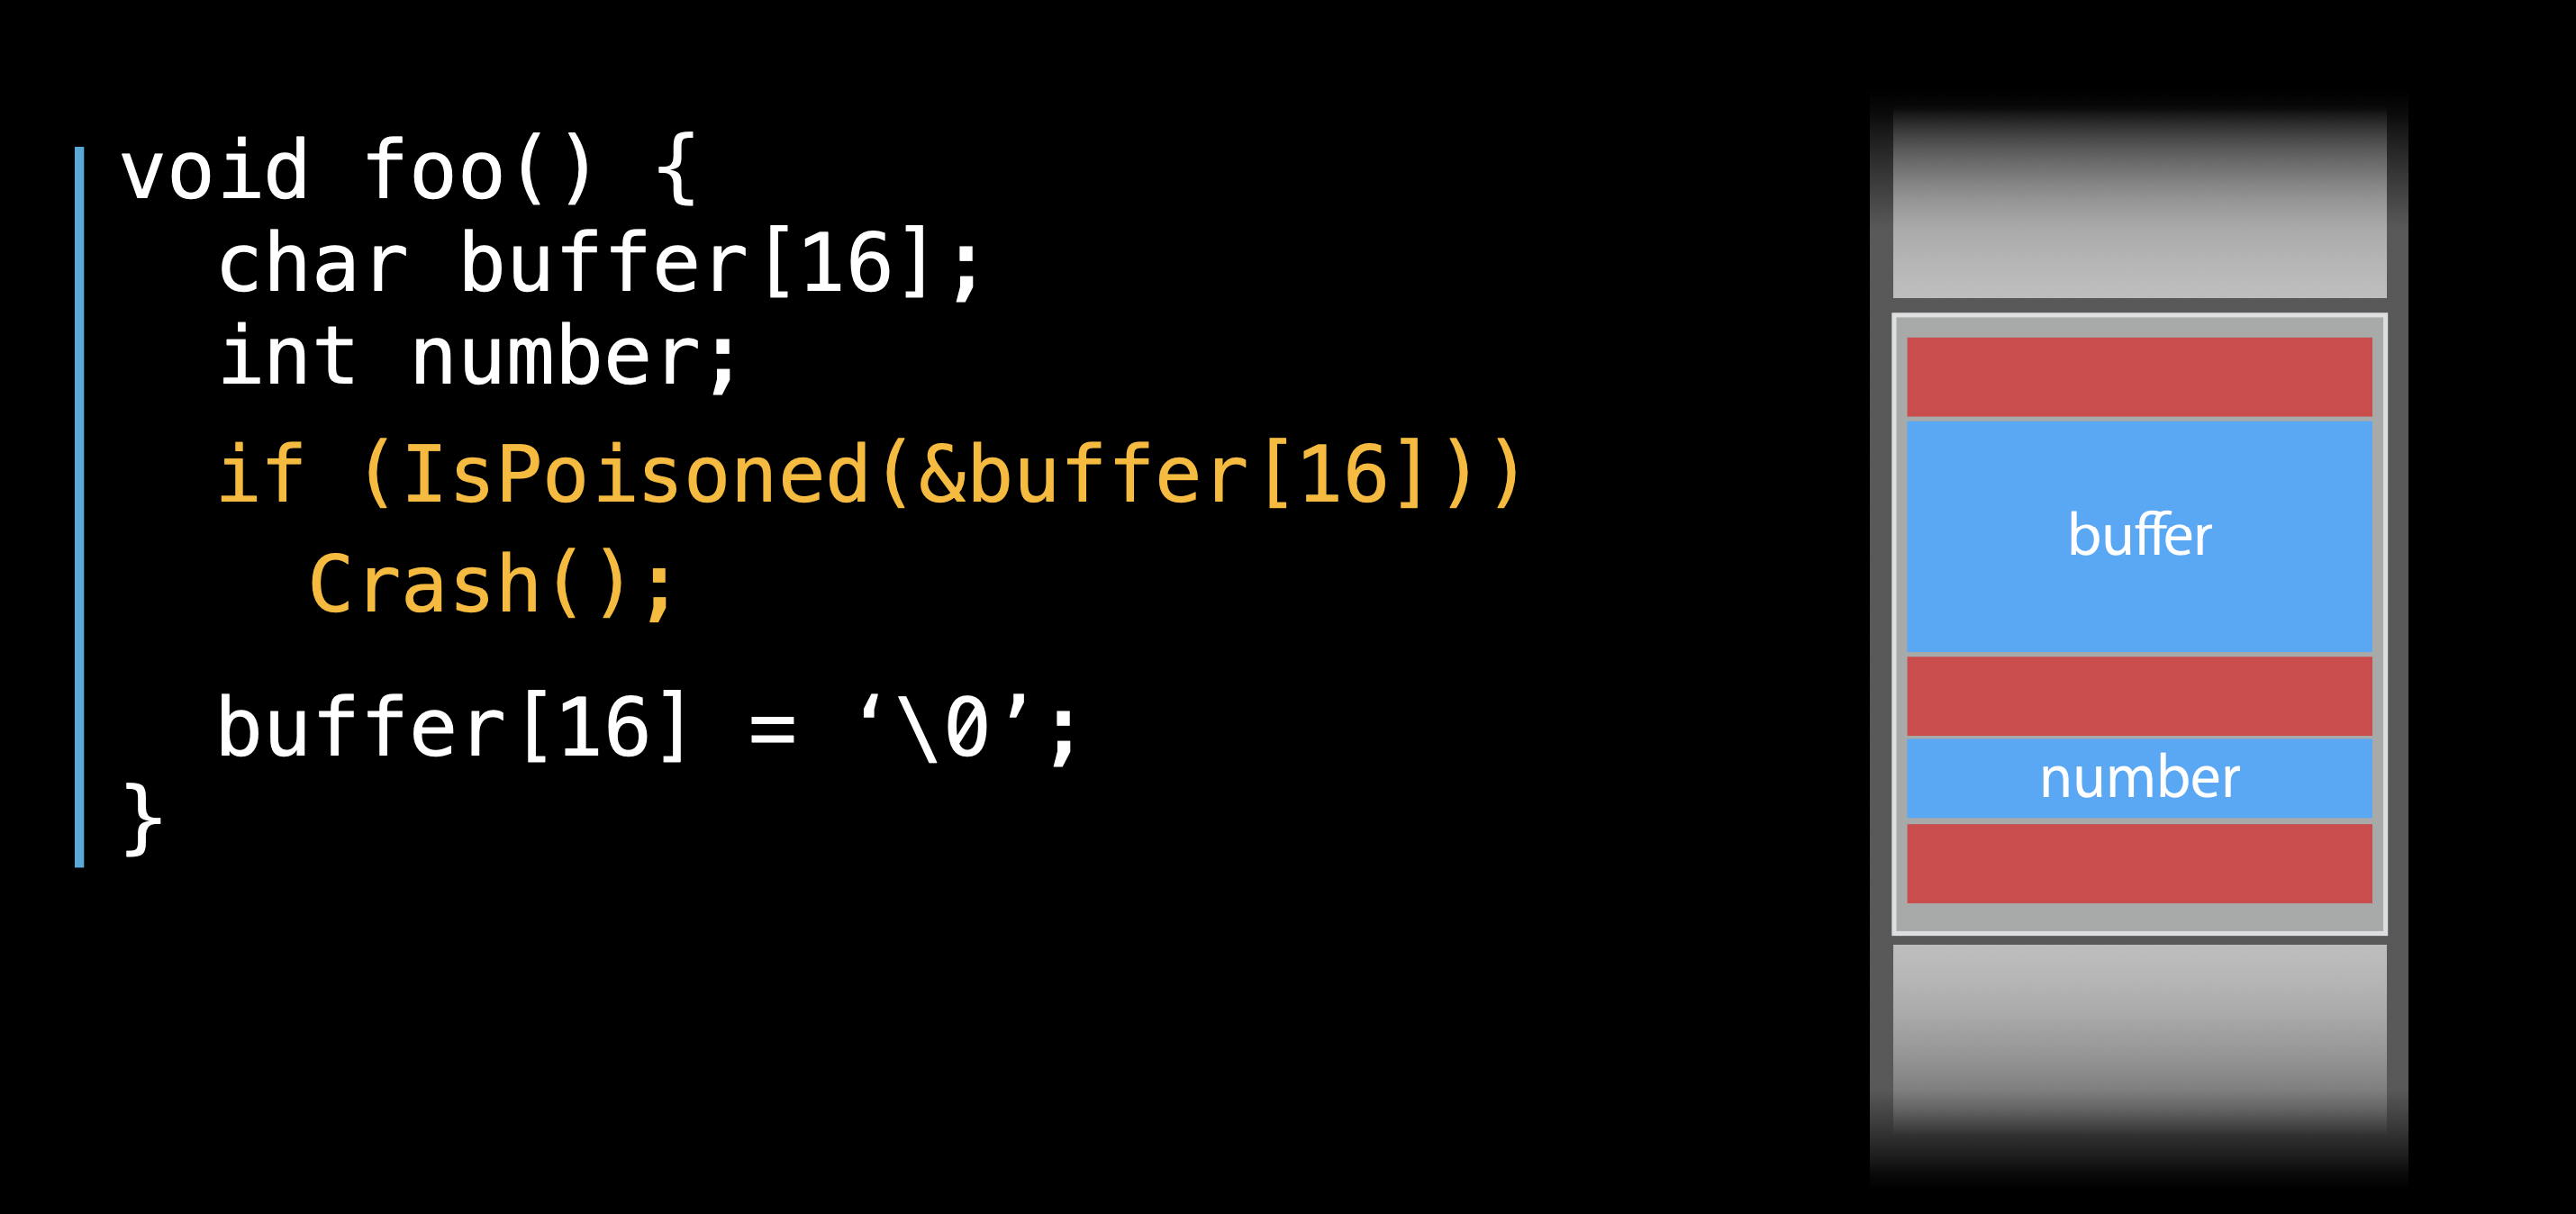
如果通过启用Address Sanitizer来编译可执行文件,则每次访问内存之前,都会有前缀指令来检查该内存是否为poisoned.如果是,Address Sanitizer 将生成如上所示的诊断报告。
下图显示该进程正在尝试访问中毒内存,并触发Crash并生成诊断报告。
堆对象分配
Address Sanitizer通过使用它自己的分配实现来替换默认的 Malloc 实现,该实现将对象彼此分开,中间插入有毒内存。
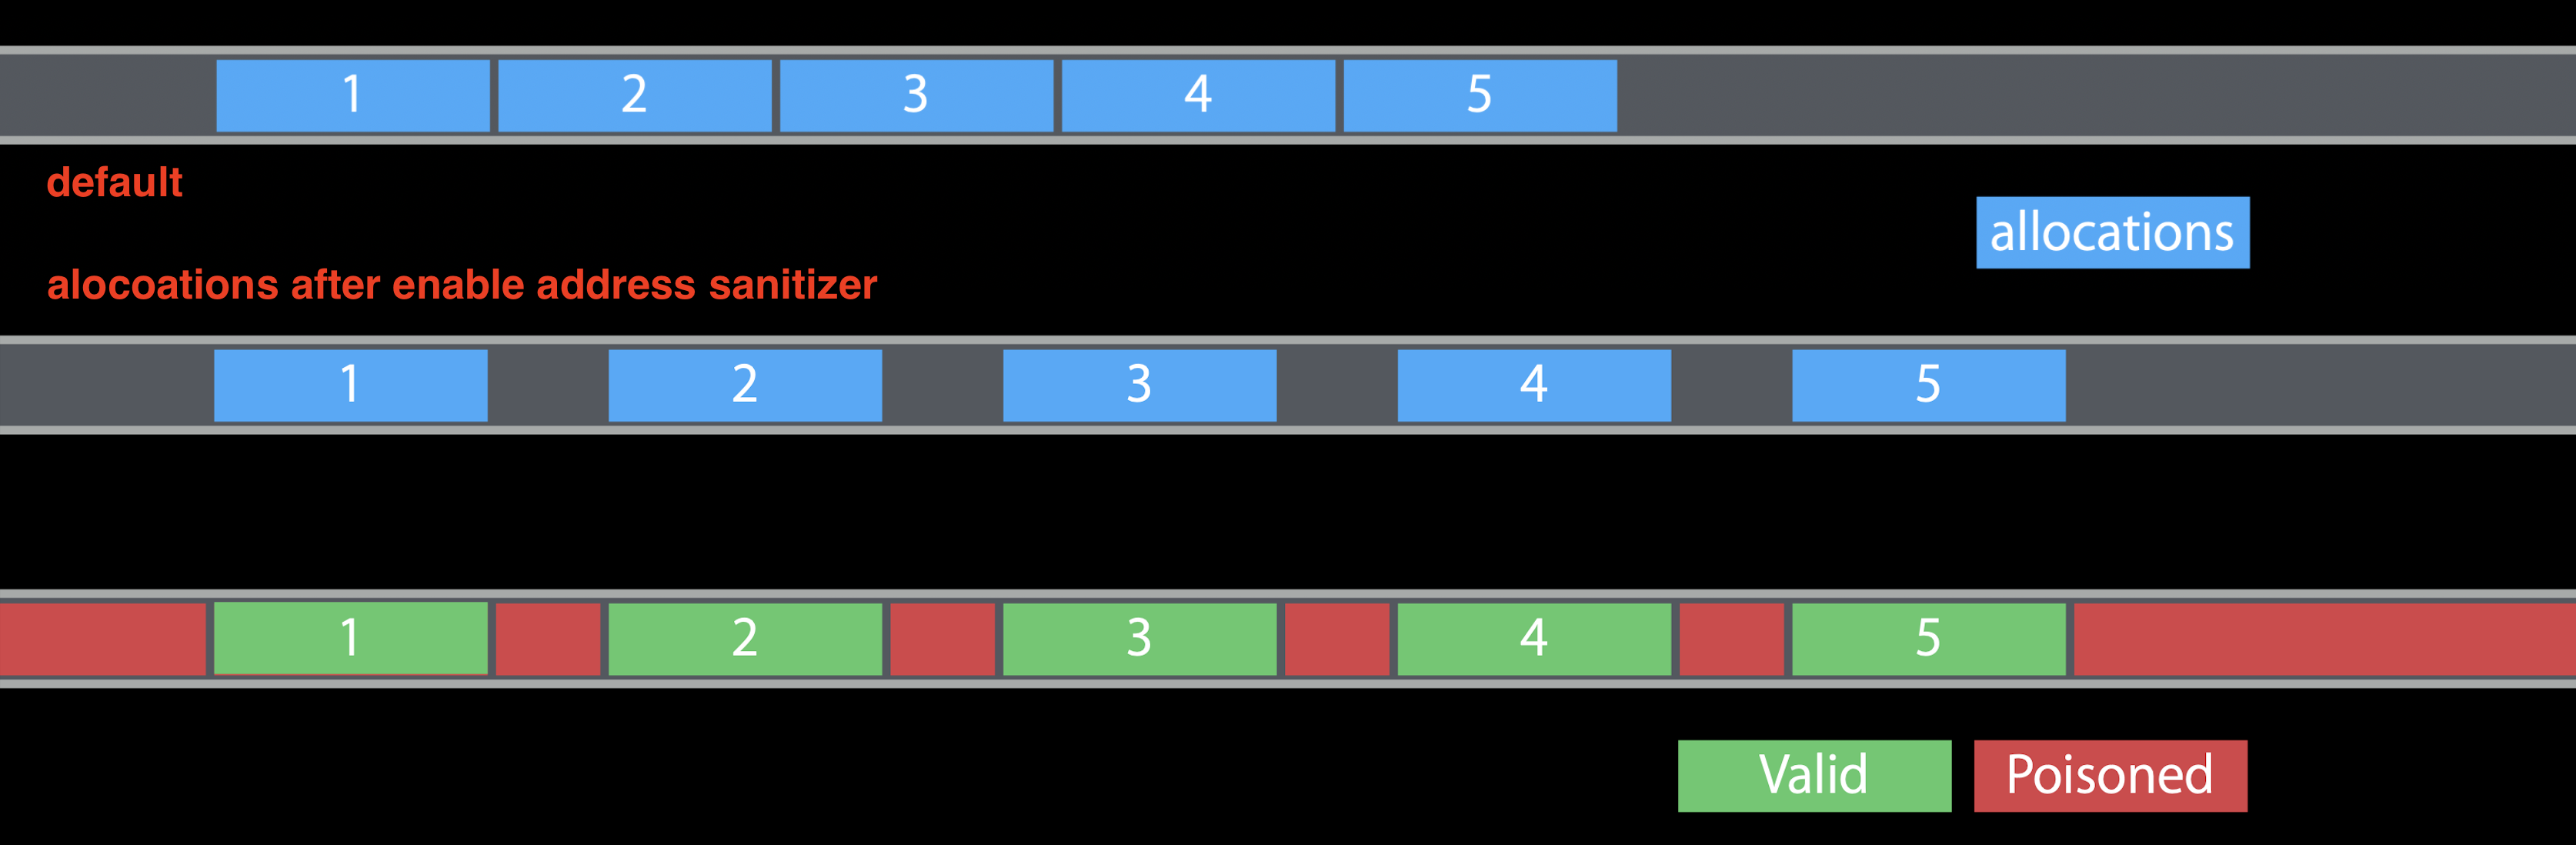
堆栈变量
在两个堆栈变量之间插入一些红色区域,因此堆栈红色区域在运行时中毒。
额外的开销
- CPU 减速通常在 2 倍到 5 倍之间 正常情况下,CPU 速度减慢 2 倍至 3 倍。在某些极端情况下,他们的速度下降了 5 倍。
- 内存开销 2x–3x
- AddressSanitizer 使用比本机运行更多的实际内存。确切的开销取决于分配大小。分配越小,开销就越大。
- AddressSanitizer 使用更多的堆栈内存。我们看到增长高达 3 倍。
实战演示-libpng
0x0.编译fuzz目标
libpng是开源的png解析库
1
2
3
4
5
6
|
$ wget https://nchc.dl.sourceforge.net/project/libpng/libpng16/1.6.36/libpng-1.6.36.tar.xz
$ tar xvf libpng-1.6.36.tar.xz
$ cd libpng-1.6.36
$ ./autogen.sh
$ CC=afl-clang CXX=afl-g++ ./configure --enable-static
$ make -j4
|
--enable-static : 用于生成静态库,fuzz开源库时会需要
0x1.准备环境(准备种子)
获取官网提供的测试集作为输入
1
2
3
4
|
$ mkdir fuzz_in fuzz_out
$ cd fuzz_in
$ wget http://lcamtuf.coredump.cx/afl/demo/afl_testcases.tgz
$ tar xvf afl_testcases.tgz
|
0x2.开始fuzz#
1
|
$ afl-fuzz -i ../fuzz_in/png/full/images -o ../fuzz_out ../.libs/pngimage @@
|
../fuzz_in/png/full/images为afl测试集
../.libs/pngimage是编译出来的被测试程序
@@代表测试输入样本
0x3.报错处理(如果安装在系统上时)
AFL测试时用到功能需要还没有开启
1
2
3
4
|
sudo su
echo core >/proc/sys/kernel/core_pattern
cd /sys/devices/system/cpu
echo performance | tee cpu*/cpufreq/scaling_governor
|
总结
- 使用AFL在linux上fuzz开源软件十分简单
- 大多数的lib/开源软件的源代码都是可以获取的
- 在编译时插桩是可行的
- 在Fuzz时要用ASAN,MSAN,UBSAN
- 有时最需要花费时间的过程是项目编译
- 缺失引用的第三方库(lib)
- 编译过程中的各种错误
- 不同项目不同的编译方法与各种选项